


Home Studio – 0. Comopsition
나는 2월 첫날 아침에 컴퓨터 앞에 앉아서 내 블로그에 무슨 글을 쓸까 생각하다가, “컴퓨터를 기반으로 자신의 방에 홈스튜디오(Home Studio)”를 만들고자 하는 분들을 위해 몇 자 적어 봅니다.
예전 같으면 녹음기를 틀어 놓고 녹음하거나, 요즈음에는 휴대폰을 이용하여 좀 더 쉽게 녹음을 할 수 있습니다. 그런데, 좀 더 나은 녹음을 하고 싶어하는 사람들이 많아졌습니다. 여러분은 직접 노래를 불러서 녹음도 해보고, 악기를 연주하면서 나중에 들어보기 위해 녹음이 필요하기도 하고, 때로는 떠오르는 악상을 저장해서 작곡도 하고 싶어할 것입니다. 이런 다양한 요구에 걸맞에 컴퓨터를 이용한 녹음이 전문 스튜디오가 아닌 가정에서도 가능해졌습니다. 컴퓨터와 녹음과 관련된 주변기기의 발전으로 ‘홈스튜디오’의 실현이 더욱 쉬워졌습니다.
휴대폰에 간단하게 스케치하는 수준이 아닌 좀 더 프로페셔널한 녹음을 지향하는 사람들이 늘어났습니다. 또한 관련 기기들의 가격도 일반인도 쉽게 접근할 수 있는 수준에 이르렀기 때문에 홈스튜디오의 시장은 그만큼 커졌습니다. 따라서 아마추어 뮤지션이나 일반인들도 그들만의 홈스튜디오를 갖게 되었습니다.
오늘은 홈스튜디오의 구성에 대하여 간단하게 적어보려고 합니다. 나중에 따로 하나씩 좀 더 상세한 설명을 하려고 합니다.
홈스튜디오의 구성
1. 컴퓨터 (Computer) [자세히 보기]
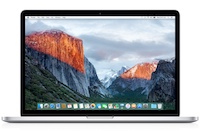 홈스튜디오는 거의 컴퓨터를 기반으로 하기 때문에 컴퓨터가 꼭 필요합니다. 여러분에게는 데스크탑이든지 랩탑이든지 간에 누구나 컴퓨터가 하나쯤은 있습니다. “녹음을 하려면 컴퓨터가 얼마나 좋아야 하나요?”라고 묻는 사람들이 많습니다. 물론, 높은 사양의 컴퓨터이면 좋겠지만, 그렇게 비싼 컴퓨터는 필요가 없습니다. 게임을 할 수 있는 수준의 컴퓨터가 있으면 됩니다.
또 사람들이 자주 하는 질문이 있습니다. “홈스튜디오를 만들려면, Mac과 PC 중에 어떤 것이 더 좋아요?”라고 말입니다. 아무거나 상관이 없습니다. 자신이 현재 사용하고 있는 컴퓨터이면 됩니다. 다만, 램은 최소 8기가인 컴퓨터라면 좋을 듯 합니다. 너무 사양이 떨어지는 컴퓨터는 쉽게 과부하가 걸리기 때문입니다.
한가지 첨언하자면, 컴퓨터에 대하여 좀 더 친근하고, 좀 더 많이 아는 분이라면 홈스튜디오를 꾸미는데 더 쉽게 접근할 수 있습니다.
2. 녹음 프로그램 (DAW, Digital Audio Workstation) [자세히 보기]
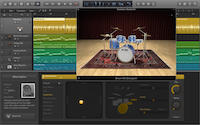 여러분들은 프로툴스라든가, 로직 프로 X와 같은 녹음관련 프로그램들의 이름을 들어 보셨을 것입니다. 여러분은 전문 스튜디오의 표준이라고 할 수 있는 “프로툴스”를 홈스튜디오에서도 사용할 수 있습니다. 그러나 저는 여러분들에게 “어떠한 프로그램도 괜찮다.”라고 말하고 싶습니다. 나중에 설명할 오디오인터페이스에 들어있는 프로그램으로도 충분히 홈스튜디오를 꾸밀 수 있기 때문입니다.
일반적으로 음악을 녹음하고 편집하는 프로그램들을 DAW(Digital Audio Workstation)라고 부릅니다. 앞서 언급한 프로툴스나 로직 프로 X 이외에도 다양한 종류의 DAW가 있습니다.
- ACID Pro
- Ardour
- Audiotool
- Cubase
- Digital Performer
- FL Studio
- Fairlight
- GarageBand
- Live
- Logic Pro
- Maschine
- Mixcraft
- Mixbus
- MuLab
- Nuendo
- Pro Tools
- REAPER
- Renoise
- Reason
- Samplitude
- Studio One
3. 오디오인터페이스 (Audio interface) [자세히 보기]
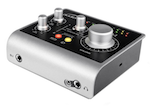 ‘오디오인터페이스‘는 외장형 사운드카드입니다. 오디오인터페이스나 사운드카드나 모두 아날로그 신호를 디지털 신호로, 디지털 신호를 아날로그 신호로 바꾸어주는 컨버터 역할을 하는 장치입니다. 컴퓨터에 내장되어 있는 사운드카드로도 음악작업을 할 수 있습니다. 그러나 일반적으로 편의성 및 접근성, 그리고 퀄리티 때문에 외장형 오디오인터페이스를 사용하게 되는 것입니다.
오디오인터페이스의 종류는 매우 다양하고, 만드는 회사도 많습니다. 컴퓨터와 연결하는 연결하는 방식도 다양합니다. 또한, 오디올인터페이스의 가격도 저렴한 것부터 매우 비싼 것까지 천차만별입니다. 따라서 홈스튜디오를 만들기 전에 여러분은 많은 정보를 얻은 후에 각자에게 적합한 오디오인터페이스를 선택해야 하기 때문에 매우 신중할 필요가 있습니다.
4. 모니터링 스피커와 헤드폰 (Studio Monitors Headphones) [자세히 보기]
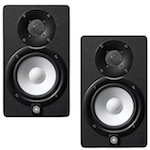 컴퓨터에 녹음된 음악을 듣기 위해 스피커 필요합니다. 컴퓨터에 달려 있는 스피커나 컴퓨터용 스피커, 또는 집에서 사용하는 오디오 스피커도 사용할 수는 있습니다. 그러나 여러분이 녹음한 소리를 제대로(객관적으로) 들을려면 모니터링 스피커가 필요합니다. 요즈음 나오는 저렴한 모니터링 스피커도 그 성능이 스튜디오에서 전문적으로 사용하는 스튜디오 모니터 스피커에 준하는 수준입니다.
모니터링 스피커와 함께 헤드폰도 꼭 필요합니다. 헤드폰은 여러분의 목소리나 악기를 녹음할 때 꼭 필요한 요소입니다.
5. 마이크 (Microphone) [자세히 보기]
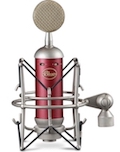 나중에 자세히 언급하겠지만, 마이크의 종류도 매우 다양하다. 따라서 마이크에 대한 정보를 수집하고 자신에게 알맞는 마이크를 선택하는 일은 매우 중요합니다. 마이크의 가격이 10배가 넘는다고 10배의 좋은 소리를 내는 것은 아닙니다. 약간의 차이에도 그 가격차이는 매우 심합니다. 따라서 처음 홈스튜디오를 만드는 분들께는 가능한 저럼한 마이크를 선택하라고 권하고 싶습니다.
다만, 컨덴서 마이크나 USB 마이크를 선택하라고 권하고 싶습니다.
홈스튜디오를 시작하려는 분들께 드리는 조언
이렇게 홈스튜디오를 만들기 위한 구성요소들에 대하여 언급하였습니다. 순수한 아마추어 뮤지션이든지, 프로페셔널을 지향하든지 간에 몇가지 조언을 하고 싶습니다.
- 최소한의 장비와 최소한의 투자로 시작하길 바랍니다. 여러분이 처음 홈스튜디오를 생각한 것처럼 잘 되지 않을 수 있습니다. 나는 여러분들이 무턱대고 좋은 장비나 비싼 장비를 준비하는 것 보다는 가장 기본적인 장비를 준비하기를 권합니다. 더 좋은 장비는 나중에라도 언제든지 구입할 수 있기 때문입니다.
- 여러분은 모든 것을 즐길 준비가 되어 있어야 합니다. 이것을 인생의 짐이나 숙제로 여기면 안됩니다. 따라서 세팅하는 것 부터 시작해서, 기기들을 사용해서 녹음하는 모든 과정을 즐길 수 있어야 합니다. 음악적 재능이나 실력이 없어도 괜찮습니다.
- 여러분은 홈스튜디오를 만들려고 했을 때의 마음을 잃지 마십시요. 물론 터무니없는 환상을 가지고 시작한 경우가 아니라면, 초심을 잃지 않는 것이 매우 중요합니다.
- 또한 여러분은 홈스튜디오를 만들고, 장비들을 구입하고, 또 이것들을 이용하여 음악을 만든다는 이유로 인하여 가족을 멀리하거나 소홀히하면 안됩니다. 가족은 홈스튜디오와 비교할 수 없는 소중한 존재이기 때문입니다.
- 프로페셔널 스튜디오와 자신의 홈스튜디오를 비교하지 마십시요. 자신이 추구하고자 하는 목적에 맞도록 자족하는 훈련이 필요합니다. 그래야만 필요없는 낭비를 하지 않게 됩니다.
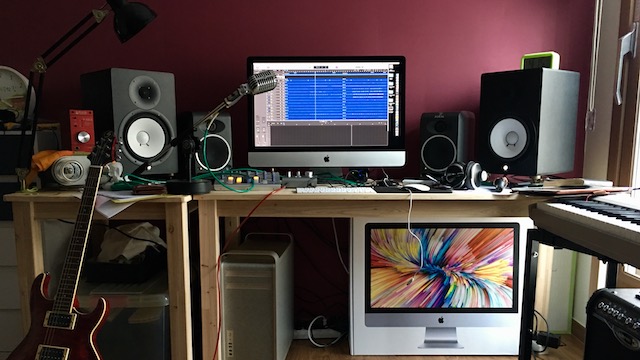
위에 링크된 글은 최근에 다시 꾸민 나의 시스템 구성이다.
I am sitting in front of my computer on the first morning of February, thinking about what to write on my blog, and write down a few words for those who want to make “Home Studio”.
In the past, you can record with the recorder turned on, and nowadays, you can use the phone to record more easily. By the way, there are more people who want to record better. You may want to sing and record yourself, play a musical instrument, record later to listen to it, or even save and compose an evil act. In response to these various needs, computer-based recording has become possible in homes, not professional studios. With the development of computers and recording peripherals, the realization of a ‘home studio’ has become even easier.
More people are looking for more professional recordings rather than simply sketching on mobile phones. In addition, the prices of related devices have reached the level of easy accessibility for the general public, so the market for home studios has increased accordingly. As a result, amateur musicians and the public have their own home studio.
Today I am going to write a brief note about the composition of my home studio. Later, I will try to explain it in more detail one by one.
1. Computer
Home studios are almost always computer-based, so you need a computer. Everyone has a computer, whether it’s a desktop or a laptop. Many people ask, “How good is your computer to record?” Of course, it would be nice to have a high-end computer, but you do not need that expensive computer. If you have a computer capable of playing games.
There are also questions that people often ask. “To create a home studio, which one do you prefer, Mac or PC?” It does not matter anything. This can be any computer you are currently using. However, it would be nice if the computer has at least 8 gigabytes of RAM. Computers that are too slow are easily overloaded.
One thing to keep in mind is that if you are more familiar with computers and know more, you can more easily access your home studio.
2. Digital Audio Workstation(DAW)
You may have heard the names of Pro Tools, Logic Pro X and other recording related programs. You can use “Pro Tools”, a standard in professional studios, in your home studio. But I would like to say to you, “Any program is okay.” This is because the programs included in the audio interface that will be described later can be enough for home studio.
The applications that typically record and edit music are called DAW (Digital Audio Workstation). In addition to the above mentioned Pro Tools or Logic Pro X, there are various DAW types.
- ACID Pro
- Ardour
- Audiotool
- Cubase
- Digital Performer
- FL Studio
- Fairlight
- GarageBand
- Live
- Logic Pro
- Maschine
- Mixcraft
- Mixbus
- MuLab
- Nuendo
- Pro Tools
- REAPER
- Renoise
- Reason
- Samplitude
- Studio One
3. Audio Interface
The audio interface is an external sound card. Both the audio interface and the sound card are devices that convert analog signals into digital signals and convert digital signals into analog signals. You can also work with the sound card built into the computer. However, because of their convenience, accessibility and quality, they usually use an external audio interface.
There are many types of audio interfaces, and many companies make them. There are many ways to connect to your computer. Also, the price of an audio interface is very different from low to very expensive. So before you create a home studio, you need to be very careful because you have to get a lot of information and then choose the right audio interface for you.
4. Studio Monitors and Headphones
You need speakers to listen to music recorded on your computer. You can also use a computer-based speaker, a computer speaker, or a home-use audio speaker. However, you need monitoring speakers to hear your recorded sound properly. The low-cost monitoring loudspeaker these days is comparable to the studio monitor speakers that are used professionally in the studio.
Headphones with monitoring speakers are also essential. Headphones are a must when recording your voice or instrument.
5. Microphone
As you will see later on, there are many different kinds of microphones. So it’s very important to gather information about your microphone and choose the microphone that’s right for you. It does not sound ten times as good as the price of a microphone is over 10 times. Even the slightest difference in price difference is very serious. So, for those who are creating their home studio for the first time, I would recommend you to choose a mic that is as low as possible.
However, I would recommend that you choose a condenser microphone or a USB microphone.
In addition to avobe,
I mentioned the components for your creating a home studio. Whether you are a pure amateur musician or a professional, I would like to give you some advice.
- Begin with minimal equipment and minimal investment. It may not be as good as you thought home studio for the first time. I recommend that you prepare the most basic equipment rather than preparing yourself for good or expensive equipment. Better equipment can be purchased at any time later.
- You must be ready to enjoy everything. You should not consider this a burden or a homework of life. Therefore, starting with setting, you should be able to enjoy all the steps of recording using devices. It’s okay if you do not have musical talent or skills.
- Do not lose heart when you try to create a home studio. Of course, it is very important not to lose an introductory mind unless you start with an absurd fantasy.
- Also, you should not distract or neglect your family because you are creating a home studio, purchasing equipment, and making music using them. It is because family is a precious existence that can not be compared with home studio.
- Do not compare Professional Studio with your home studio. You need training to be suited to the purpose you want to pursue. That way, you will not waste unnecessary.